Monday, July 16, 2018

Preflowering: The Puberty of Planthood

Preflowers
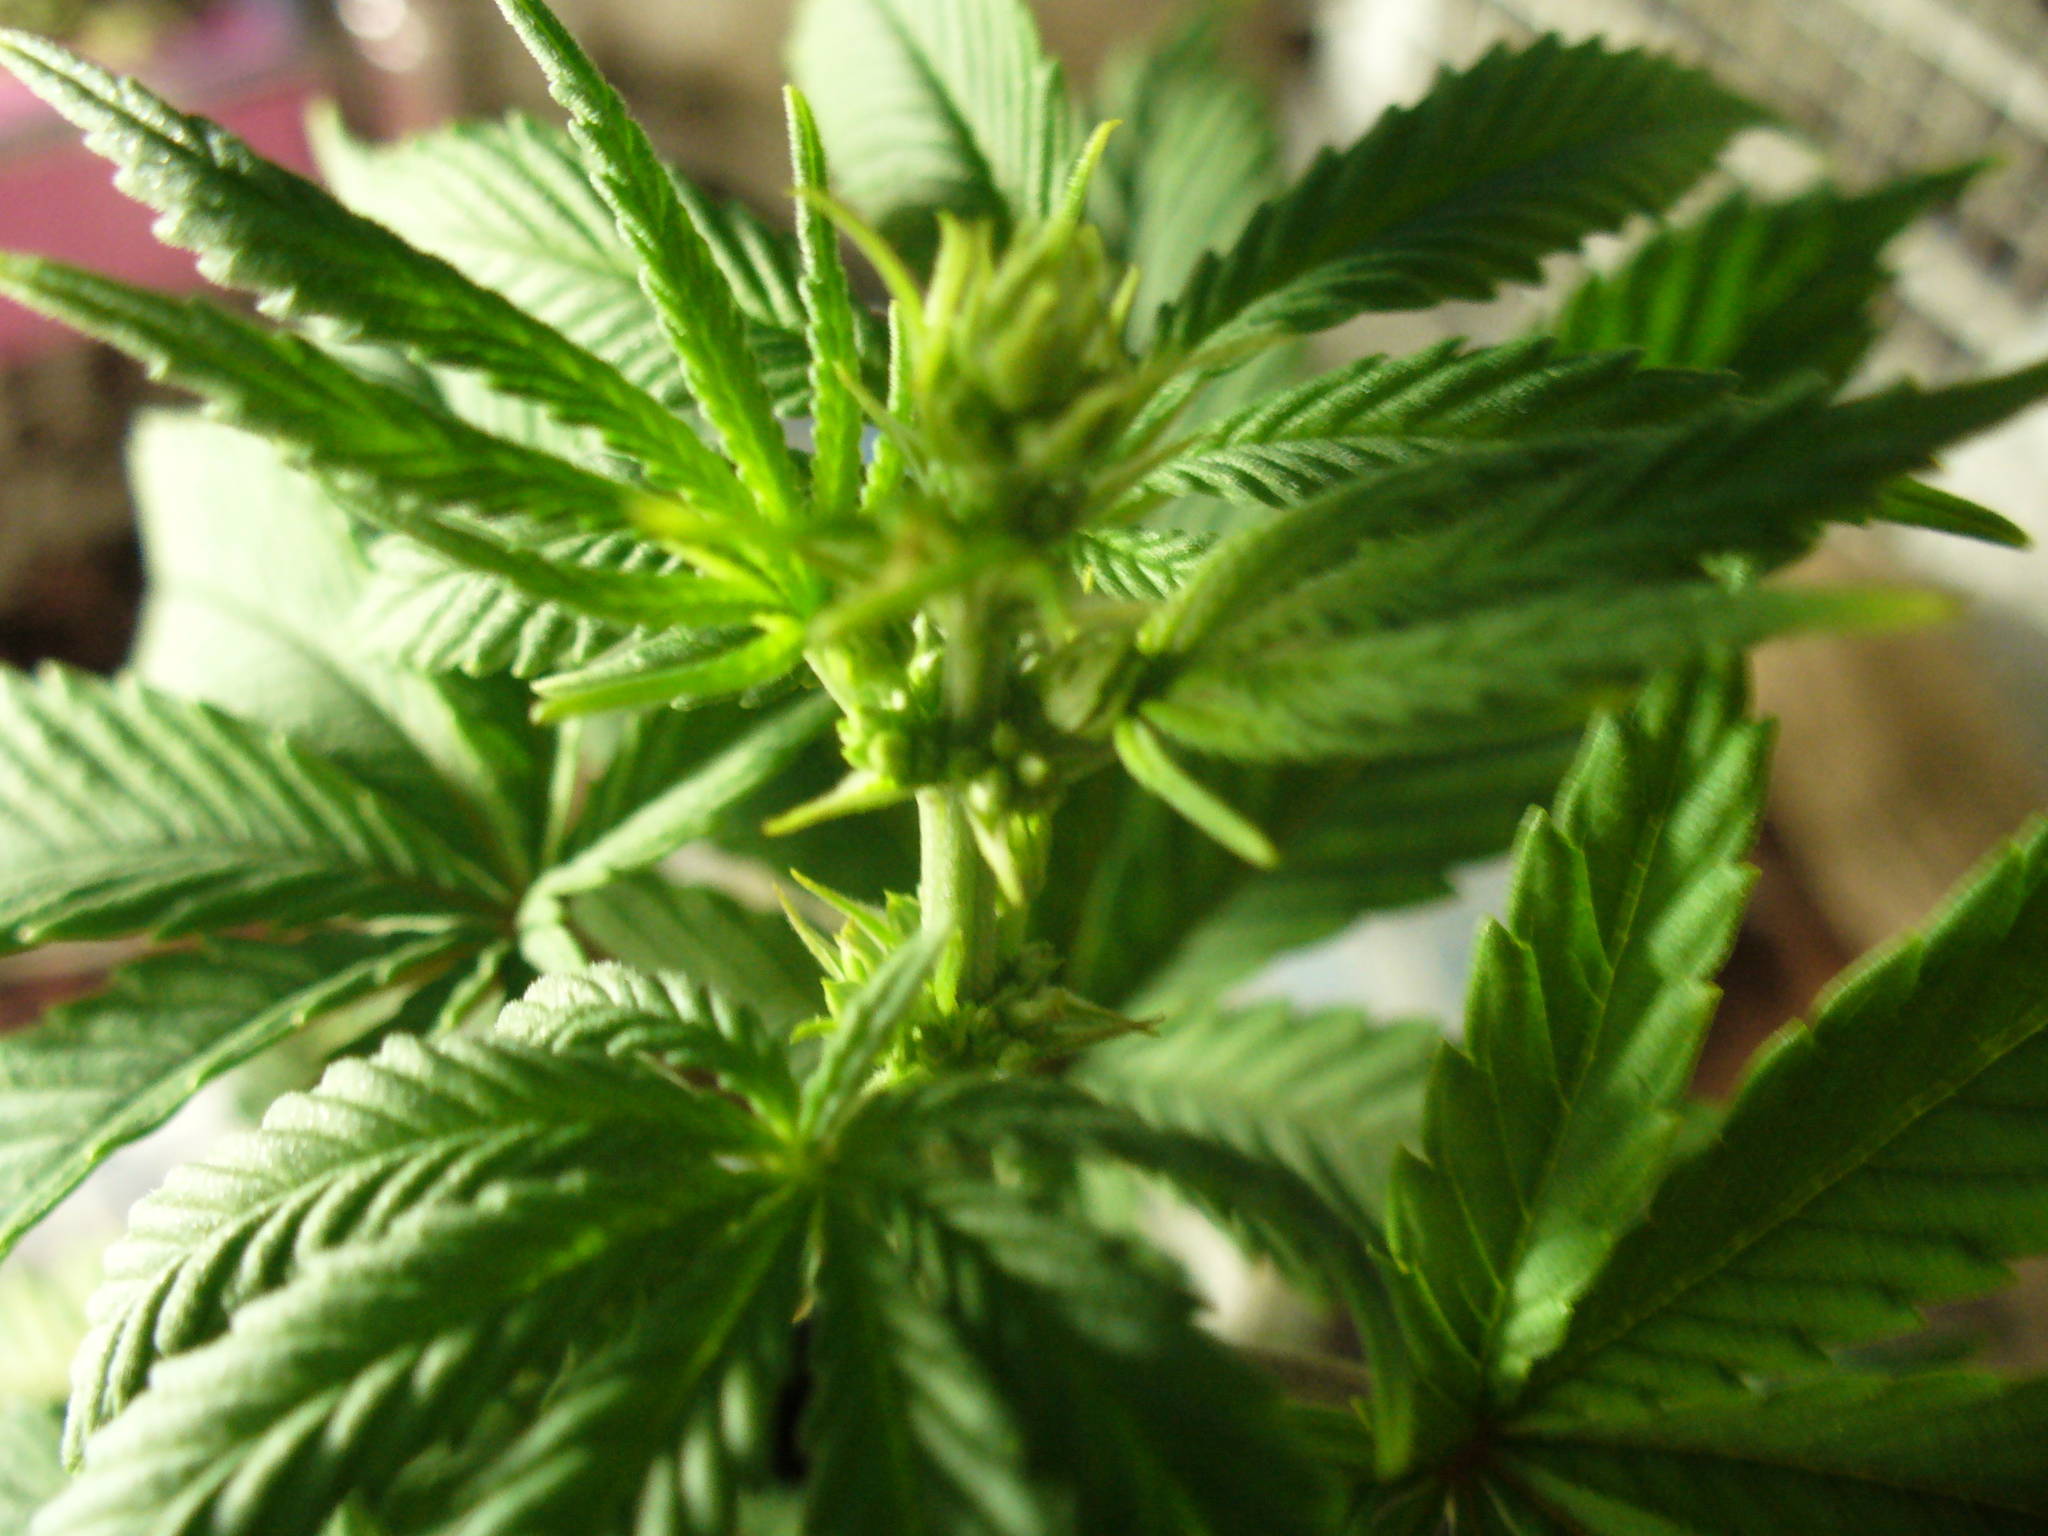
Ahh, adolescence.  A time of rapid growth, social awkwardness & sexual blooming.  Even cannabis plants go through this puberty-like phase in their journey to adulthood.  For autoflowers, this generally happens from Week 4 through Week 6's end.  During this phase, the plant nearly doubles in height while starting to form little wispy pre-flowers & secondary sex characteristics (stamens or pistils).  As with humans, plants are extra hungry during this time of life & will start needing extra nutrition in the form of nitrogen & phosphorus. This is when you will know for certain whether you have a boy or girl.  Even with feminized seeds you can sometimes get a male or hermaphrodite, though this is rare with quality seeds.  If you see signs of "balls" developing, don't waste time pulling the plant & disposing of it away from your females, as it can spread its pollen far & wide as soon as the sacs burst.  The male stamens tend to form in bunches like little grapes & are more rounded while pistils are tear-drop shaped with a tiny white hair emerging from the top.

There are countless guides online for distinguishing male/female plants, but here are some photos to help:
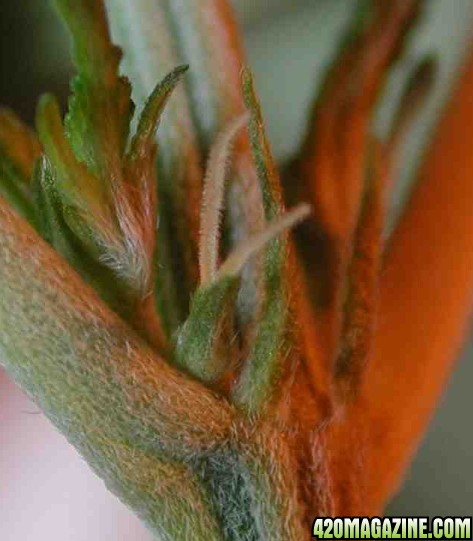
Female plant w/ white pistils ("hairs") & teardrop calyx

Male plant with stamens, aka "balls."

You will probably need to raise your grow lights a couple inches during the preflowering stage due to rapid growth, which shouldn't be a problem if you have a clamp-on light or other easily moved piece.  If you have any side lighting or additional bulbs, Week 5 or 6 is a good time to add them.  You can continue with a 20/4 or 24-hour light cycle if you wish, but I chose to pull back to 18/6 in Week 5 to save on electricity for the rest of the grow.  Remember to keep your bulbs about 4 inches away from the plant's surface--close enough to be effective but not so close it overheats.  If you see any cupping or "taco-ing" (folding down the middle in the shape of a taco shell) of the leaves, that's a sign of heat stress.  Pull the bulb away a bit.

While flowering has technically started, it's important to continue feeding a nitrogen-rich supplement all the way through this phase to prevent deficiencies later on.  This will also support the rapid growth that's taking place now.  My plant developed its first yellow leaves in late Week 4 when growth was accelerating, so I fed her some grass clipping tea (rich in nitrogen & potassium).  I applied it with a spray bottle to the leaves & then added some to her regularly scheduled watering in Week 5.  She responded great & the yellowing stopped.  But you can continue using the same general purpose vegetative fertilizer you've been using if you don't want to make your own.  Nitrogen deficiency presents as yellowing leaves starting at the bottom of the plant & moving upward.  When severe, the stems will turn purplish red & the leaves will get crispy on the ends & die.  But nitrogen deficiency is easily reversed by feeding some balanced N-P-K fertilizer, heavy on the "N".
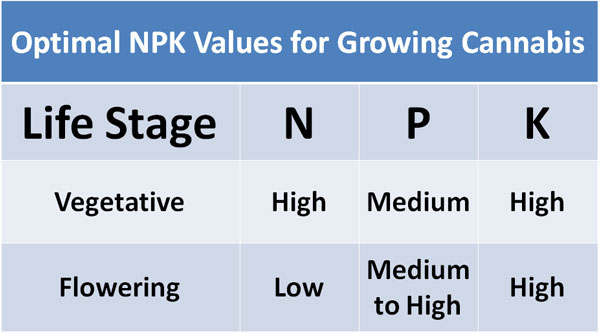
Nutrient chart.  Stay with vegetative fertilizer during preflower.

Preflower is also when you'll want to start adding phosphorus to your feeds.  Phosphorus increases the number of bud sites on your plant while improving stem strength, nutrient uptake & disease resistance.  It's found naturally in the shells of crustaceans like shrimp, as well as bone meal & rock dust.  I used Tetramin brand fish flakes as my phosphorus source, but be careful if you go this route as Tetramin also contains a lot of other ingredients with unknown effects.  I couldn't tell whether it had any effect on the plant at all--good or bad.  You're better off going with a trusted source of phosphorus such as kelp meal, bone meal or bat guano.

As for the frequency of these nutrient feedings, you should follow the directions on your fertilizer container or simply apply the homemade stuff as needed.  I made a pre-planned schedule for feeding that worked pretty well.  You certainly don't need to feed with every watering if you're growing in soil.  Here's what my fertilizing schedule looked like for those curious:

PSYCHONAUT'S HOMEMADE FERTILIZER SCHEDULE
WEEK 1:  ---
WEEK 2:  ---
WEEK 3:  Diluted urine (12:1 solution) - 1 time application
WEEK 4:  Grass clipping tea (1:1 solution) - 2 foliar applications with spray bottle
WEEK 5:  Grass clipping tea (1:1 solution) - 2 applications + Tetramin fish flakes - 1 application
WEEK 6:  ---
WEEK 7:  Banana tea - 2 applications
WEEK 8:  Emergency FLUSH (plain water x 3 cups) + Diluted urine (8:1 solution)
WEEK 9:  Diluted urine (8:1 solution) + Tetramin fish flakes; Epsom salt - 1 application
WEEK 10:  Pure Maple Syrup + Brown sugar - 1 application; Epsom salt - 1 application
WEEK 11:  Ice water flush

(The banana tea was the only mistake in terms of my fertilizer choices.  I recommend choosing a different potassium source, but we'll save that for the next article since it's more of a "flowering phase" issue anyway).

Phosphorus-rich fertilizer.  Use in moderation.
Once buds start to form, you will want to stop all misting & foliar watering of the plant as this encourages bud rot.  You can still water the soil from the top, just take care not to spray the whole plant or buds.  They prefer lower humidity as they age anyway.  I did my very last foliar mist in Week 4 with the grass tea.  You may also need to increase the frequency of your watering around Week 5.  I went from twice weekly to 3 or 4 times per week when I stopped the foliar misting.  Again, there is no set amount you should be watering--learn to listen to what the soil & plant are telling you.  If the soil is dark & muddy on top, it doesn't need more water.  If your plant is droopy but the soil is bone dry, it's time for some water.  If unsure, stick your index finger in the outer rim of the container; if it's dry up to the first knuckle, you can water.

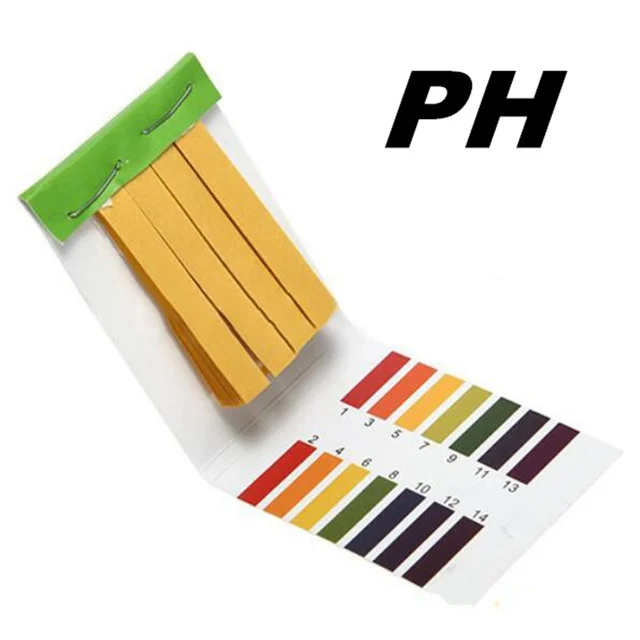
Once you start fertilizing, it's important to check your pH levels (if you haven't already been doing so).  You can get a digital pH meter or the cheaper strips for this.  I went with the cheap $0.83 strips which aren't all that easy to read but aren't exactly Advanced Calculus either.  Make sure to dip the strip in your water AFTER adding the fertilizer so you'll get an accurate reading.  Shaking up the solution can cause fluctuations in pH so check it before shaking.  You want to aim for readings between 6 & 7 when growing in soil.  Anywhere in that range is okay, and variations with each watering are ideal since different nutrients are absorbed at different pH ranges. 

Don't let all the nutrient/fertilizer talk scare you away.  If it seems too daunting, go with a store-bought variety & follow the instructions on the container.  I just preferred to try it with all natural items to see what would happen, and it turned out great for the most part.  There are basically only two types of nutrients you might need:  vegetative & flowering formulations.  If you only get one, let it be a general purpose balanced NPK fertilizer.  When in doubt, use less rather than more.  Deficiencies are much easier to fix than nutrient burns.  The goal during Weeks 4, 5 & 6 is to support the plant's rapid growth & ease the transition from vegetative to flowering phase.  You can do that by feeding nitrogen all the way through the end of Week 6 and adding a phosphorus source starting around Week 5.

Monday, July 9, 2018

Phase 3: Veggin' Out


Bushy plants in veg mode

The vegetative period is pretty straightforward--the plant grows in height & width by doubling its sets of leaves on top.  It may start to look big & unruly during this period, which might tempt you to remove some leaves.  We'll get to this in a minute.

But first:  As soon as the plant's first set of true leaves is large & bulky, you should begin exposing it to an oscillating or free-standing fan for at least an hour per day (if not constantly).  This will help fatten up the stem so it doesn't become weak & topple under the weight of the plant.  Don't put the fan too close or turn it on too high or you risk wind burn.  The leaves should be gently swaying in the breeze...not flapping violently.  As it acclimates to the fan you can leave it on longer or put it on a higher setting, but take it slow at first.  Try to mimic a breezy Summer's day in a meadow.  Or someshit.  💩

During veg you can do a 24/0 or 20/4 light schedule, or even 18/6.  I chose 20/4 to maximize growth potential while still giving the plant (and my electricity) time to "rest".  You should consider your grow room's temperature & other convenience factors when deciding which light schedule to pick, as it truly doesn't make any difference in the outcome of your plants.  Some growers will do 24/0 in Winter & 18/6 in Summer to manage heat.  Remember, autos don't "need" a dark period so you don't have to worry about light leaks if you do turn the lights off.  It's totally optional.  Joy. 

I stopped Ziplocking my plants with the humidity baggies after the 2nd set of true leaves was starting to get big (the plant had outgrown the baggies by then), but I continued misting 3x per week for the added humidity.  She seemed to dig this.  No fertilizer or nutrients were needed until the end of Week 3.  If you get quality soil, you can let her ride until Week 3 with no added nutes too.  I chose Black Gold Natural & Organic soil, which is full of dark stuff & big twigs.  Very nutrient-dense.

Cannabis plants need mostly nitrogen during vegetative growth, which is already in the soil.  But by the end of Week 3 it will start to become depleted, so you can add a light dose of vegetative nutrients or a homemade teas like grass clipping tea or diluted urine (yes, human pee) that are rich in nitrogen.  Just go very gently because it's easy to burn your plant when it's this small.  I used the D.U. at a ratio of 12:1 urine-to-water at the end of Week 3 & my plant loved it.  The Grass Clipping Tea is made by steeping grass clippings in warm water for up to 3 days in a covered container like a gallon water jug, straining the plant matter & applying at a ratio of 1:1 with plain water.  (There are recipes online if this isn't clear enough, or I can clarify in the comments).  If you use store-bought nutrients, read the directions carefully to see how much you should be using, and then start with 1/3rd of the recommended amount.  Store-bought is definitely EASIER & less guesswork, but if you're truly on a shoestring budget, well...

Grass clipping tea
At some point you'll probably run into over- or under-watering as you get the hang of how often to water.  If the plant looks dark green with drooping, bloated leaves and drenched soil: it's overwatered.  If the plant looks pale with paper thin leaves & parched soil:  it's likely underwatered.  Under/overwatering isn't caused by using too much water at each session but by applying it too frequently or infrequently.  You can learn to judge when your plant's thirsty by the weight of its container if you prefer more precision.  Just set it on a scale when it's completely dry & write down the weight.  Then simply water it again when it returns to that weight.  Easy peasy.

Overwatered
Underwatered
Now, as for defoliating or lollipopping, this is totally optional.  Lollipopping means removing the lower 1/3rd of leaves & bud sites on a plant while defoliating just means removing certain fan leaves strategically to increase yield.  The benefits of removing leaves include improved airflow, reduced humidity & less risk of pests/mold.  Light will also penetrate your plant better with fewer leaves, but beware:  if you run into any problems later in the plant's life, you'll wish you had some extra foliage to absorb the damage.  I learned this the hard way in Week 7 when my plant nearly died from a bad case of rootbound & over-fertilizing.  Leave some leaves on your plant, please.

If you do choose to lollipop or defoliate, wait until at least Day 30 if possible & don't remove more than 20% of the plant's leaves per session to prevent stress.  Mainly take the large old fan leaves that are blocking bud sites or those that have gone yellow at the bottom.  Leave a little sprig of the stem behind when cutting in case an infection develops so it won't go directly into the main stem.  I prefer to cut my leaves with sterilized scissors but it's okay to pluck them manually w/ clean hands if you do it gently & evenly.  If your plant has a lot of big leaves stacked on top of each other in the middle section, pluck some of those too.  They present a mildew risk.

Lollipopped plant

A ton of other advanced plant training techniques exist to increase yield, but I chose to keep it simple during my first grow & that was the right call.  Some light defoliation was all I went for.  Other techniques you can research include:  supercropping, Low Stress Training (LST), topping, FIM'ing & manifolding.  If you can pull these off, more power to ya.  But I'm saving that for my later grows. 

Not all training techniques are a good fit with autoflowers--topping & manifolding fall into this category.  Both techniques can set growth back by too many days, which is no bueno when your plant is on a pre-set deadline.  (But again, all growers have their own opinions on this stuff so I'm just giving you MINE).  LST is generally safe & beneficial if your plant is in a big enough container to warrant it.  I found that my Solo cup wasn't big enough to require or accommodate quality LST so I let the plant grow in its natural shape.

There are countless online forums to consult if you run into unexpected problems along the way...and you will.  Nutrient deficiencies, watering issues, pests, weird genetic traits, heat stress & more are troubles you could bump into on your journey.  When you happen upon an abnormality & think "Zoinks, what's wrong with my baybee?!" head on over to RollItUp.com, Autoflower.net, ICMag.com or reddit.com/r/microgrowery to get some feedback from real growers.  Or just drop me a line in the comments under this article & I'll try to help.  Including pictures of your plant (without the glare of the grow lights) is always helpful.

...all this seem overwhelming?  It should.  Because it is.  But don't let it discourage you from diving in headfirst & doing the damn thang.  It's so amazing to have this super-power, which you'll understand when you start cranking out the dank.  🌿🐛

Saturday, July 7, 2018

Phase 2: Seedling Life

https://cannabisdigest.ca/wp-content/uploads/2017/01/hemp-sprout-marijuana2.jpg

Seedlings or sproutlings are part of the VEGETATIVE PHASE of the cannabis life cycle.  The purpose of this period of life is to gain height, foliage & a strong stem to support heavy buds later on.  Your plant is like a child at this point & is not sexually or physically mature.  It will go through its awkward puberty during Week 5 or 6.  But an autoflowering plant remains in "veg" for approximately 3 to 4 weeks regardless of what you do to it.  It's on a pre-set time clock, so anything you do to slow its growth will result in a reduced yield at harvest.  As a weed, cannabis is pretty resilient overall, but at the seedling stage it's especially vulnerable to things like extreme temperatures, overwatering & predatory bugs or animals.   

As soon as your seed sprouts, it's time to get it under a CFL bulb immediately.  To be on the safe side, start with the light about 8 inches away from your seedling & only use one bulb to avoid shocking the little one.  You can lower it down to within 4 inches from the plant gradually.  Place it above--not to the side of--your plant.  I made this mistake & almost paid dearly for it.  Cannabis likes its light to come from above the same way it grows under the sun in nature.  I started with a 14/10 cycle (lights on for 14 hours per day; off for 10) to get the seedling acclimated to the light.  This went on for 2 days before switching to 18/6 for another 2 days, then finally settling on 20/4 for the rest of vegetative phase.

Ridged/serrated leaves = true leaves.  Smooth round leaves = cotyledons.

Autoflowers can grow under a 24-hour light cycle, but my plants seemed to "enjoy" the short dark period each day.  Plus it saves on electricity.  What you don't want to do is try to grow them under a 12/12 or 14/10 light cycle like a regular photoperiod plant.  That's because their lifespan is much shorter & they only have a limited time to gain height & mass.  So you'll want to maximize the time they have under the lights each day.  But in the first week, it's good to slowly increase light time so they don't fry.

At this point you should be watering thoroughly about twice per week.  But the frequency depends on your container size, soil type & other factors, so use this guide instead:  water when the soil is dry up to your first knuckle.  To test this, stick your index finger in the soil at the outer edge of the container away from the plant so as not to disturb its root system.  You should water enough that a little stream comes out the drain holes but not so much you're flushing out the nutrition in the soil.  If you want to be super precise with your watering, you can weigh your container on a scale when it's completely dry & write down the weight so you know when it's time to water again.  That eliminates the guess work. 

I chose to do one of my weekly waterings from the top & the other from the bottom in a tray, where I left the cup for 5 hours each time to soak up its water.  I also opted to do "foliar misting" (spraying the leaves with a spray bottle) 3 times per week until my plant's first set of true leaves were large.  After each misting, I'd cover the plant with a Ziploc bag for 5 hours to help keep in the humidity.  But this is totally optional.  Plants in vegetative stage need a relatively high humidity level of 60% or more, particularly when they're just little sprouts.

Ziploc humidity domes.  Apply after misting for a few hours.

Factors like humidity, heat & light stress can influence the plant's sex in the first 3 weeks of life.  If exposed to excessive heat & light along with low humidity or under-watering, it's more likely to come out male or hermie...even if it's a feminized seed.  Don't stress over this fact though; aiming for comfortable temperatures of 70-85 degrees Fahrenheit (20 or 30 Celsius) should keep your plant fully female if you have feminized seed. 

I consider plants to be out of the seedling stage when they have two sets of fully formed "true leaves" (not cotyledons).  But that's a personal thang.  It's all vegetative growth in the end.  The sprout stage is just extra fragile so I gave it its own little guide.  😊

Phase 1: Germination & Planting

And so it begins...

Ahh, germination & planting.  Two relatively easy but daunting tasks for the new grower.  These steps mark the beginning of your journey and are an exciting time!  But it's easy to mess them up if you get overzealous.  There are many ways to skin a cat/germinate a cannabis seed, but I'll tell you what worked best for me.  I placed a healthy looking seed in a cup of lukewarm (not hot!) bottled drinking water & set it on a heating pad for the first hour, swishing it around in the cup to help it sink.  Healthy viable seeds should sink eventually, but don't freak out if it doesn't happen within the first hour or two.  It might just need to be dunked down manually with a finger after a few hours of soaking.

Once the seed has sunk, your germination countdown has begun.  Leave it in the cup for about 8-12 hours in a dark place where it won't be disturbed.  Darkness & warmth are the goals at this stage.  After 12-ish hours had passed, I poured the seed into a plate of damp folded paper towels.  Make sure the seed is sandwiched between the layers, with some towel below & some covering it on top.  Drain off any extra standing water from the plate.  Never let the towels dry out completely!  The seed needs to "breathe" but should never be allowed to dry out.  You can mist it from the top with a spray bottle if you have one or pour/sprinkle more water on manually as needed.  Cover it with a paper plate for an extra layer of protection against drying out.  Again, keep the plate in a dark/warm place where the seed can do its thing.  I chose the top drawer in my closet with the drawer cracked so air could get in.  The seed had cracked before 24 hours had passed but it can take up to 7 days, so be patient.

Put seeds between towels; keep damp.  (Paper towel method)

Don't wait until the white taproot is an inch long--plant the seed as soon as it opens & the root becomes visible.  This reduces the risk of damage.  On the day of planting, soak your cup or container in water for a few hours so the seed doesn't go into a dry environment.  Using clean hands, make a half-inch hole in the soil & plant the seed with the taproot facing DOWN.  Gently sprinkle soil on top, making sure not to pack it down tightly but leave it loose so the seed won't have to fight its way out.  Do cover it completely though.

Finally, use a spray bottle to gently mist the top layer of soil before setting the container under a warm light bulb.  Place your hand on the top of the container to see if the temperature is too hot.  Cannabis generally likes the same temperatures as we humans do.  Your sprout should emerge within 1-7 days of planting if you keep the soil moist & warm.  I like to alternate between "spray & tray" every other day, meaning one day I'll water from the bottom by leaving the cup in a tray for 5 hours & the next day I'll use a spray bottle throughout the day anytime the soil looks dry instead.  But this is totally my own OCD & not necessary.  You can water from the top as long as you are using a spray bottle & being gentle.  Once the seed actually sprouts you should cut back on the watering immediately, as it's easy to drown the little gal.  More on that in the next installment. 


Thursday, July 5, 2018

Prep Phase: Shopping on a Shoestring

CHEAPO CHECKLIST:  WHAT TO BUY

This article could get reallllly long with all the brands & products out there.  I'mma keep it as simple  (and cheap) as possible because there are potentially endless types of lighting, mediums & containers you could choose from.  My way is the simplest way for beginners to spend as little as possible & get the best results...believe me, I'm both poor & lazy. 😁  Here are the things you'll need:

- 1 bag of quality soil
- 2 or 3 CFL bulbs--wattage matters more than color spectrum--more on that later.
- A socket and/or reflector for your CFL bulbs (if you don't already have one).
- A Solo® or Hefty® type plastic cup or 1-gallon pot with good drainage
- Cannabis seeds
- A floor fan or oscillating pedestal fan

I recommend starting with feminized autoflowering seeds since the sex will be certain & your total grow time will be shortened.  Autos only have about a 3-4 week vegetative phase before flowering begins and many strains are ready for harvest 10-12 weeks after planting.  They don't require a dark period at all, which lets you off the hook on buying a light timer & tent.  They can grow as big or small as their container & are generally better for tight spaces (like Solo cups or 1-gallon pots).  Some popular breeders include Dutch Passion, Mephisto, Dinafem, Barney's Farm & Crop King Seeds.  Make sure to check into things like disease-resistance, height & yield when selecting a strain since these can make or break your grow.   

Your soil should be dark, rich & well-draining.  No clay or sand.  Some popular brands include Fox Farms Ocean Forest®, Black Gold®, Roots Organic® or SoHum® Living Soils.  Do not attempt to gather soil from your backyard or use Miracle Grow brand, as it contains slow-release nutrients that will stunt your plant's development in flower.  This is not the place to skimp on quality or cut corners.  A large bag of one of these pre-mixed soils runs anywhere from $5-$15 depending on where you buy it.  If you can't find it at the store you can order it on eBay or Amazon.  After use, tape the bag shut tightly & store somewhere cool & dry.  You'll have lots of soil for future grows.

Good cannabis soil has ingredients like worm castings, peat moss & perlite.

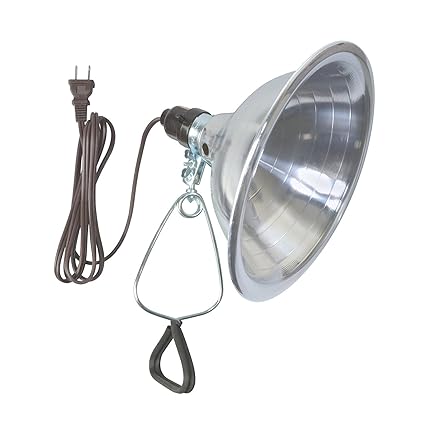
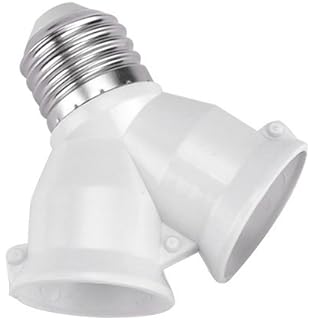
When choosing CFL bulbs, go for ones in the 40-50 watt range.  This is the most effective size & wattage range.  Plants in vegetative stage like "daylight" colored bulbs, or those in the 6500k spectrum.  Flowering plants prefer "soft white" bulbs (2700k spectrum).  BUT EITHER BULB WILL WORK FOR EITHER PURPOSE.  Ignore the "equivalent watt" rating, as it's meaningless.  Only consider the true or actual watts.  I used two soft whites my entire grow because they were cheaper & it worked just fine.  If you don't already have a socket or place place to screw the bulbs in, get a clamp-on lamp like a Woods clamp light with aluminum reflector to hold your bulbs.  To fit both bulbs inside this reflector, you'll need a Y-splitter with an E26 or E27 base & socket extender, which will cost about $6 combined for both items.  More lights = bigger yields but you can have a successful small grow with only 2-3 bulbs if they're arranged correctly.  These bulbs use less electricity than a regular incandescent light, so your electric bill won't suffer with them on all the time.  Yay!  Just be careful not to break them or get them wet, as they have mercury inside.

Image result for 40-watt cfl bulbs daylight
42-watt Daylight CFL Bulb

If you decide to grow in a plastic cup, you'll need good drainage.  So poke as many holes in the lower half of the cup as possible--particularly the underside of the cup.  These holes help "air prune" your roots while preventing root rot.  You'll also need them when watering from the bottom in a tray.  Use a safety pin, ballpoint pen or other sharp object to make small holes.  If you'd like a slightly bigger pot, get a 1-gallon Smart Pot, Airpot or other well-ventilated container.  Avoid clay pots as they drain poorly & get overheated.  Since autoflowers don't like to be transplanted, go ahead & plant your seed in its final home.  (I'm recommending small containers because the plant will stay smaller, thus requiring less light, food & space.  It will also be easier to stash away & hide the smell if stealth is an issue.  But most autoflower growers use a 3-to-5 gallon pot to produce a regular-sized plant).

Lastly, make sure you have a clean, well-ventilated space to set up your grow.  A walk-in closet, a small room that's not used by guests, etc.  The temperature should not exceed 85 degrees if possible & it shouldn't get too humid or damp.  You'll want access to a small floor fan or oscillating fan to keep fresh air moving & strengthen your stems as your plant grows.  You can also set up a reflective backboard behind your plant if you like to help maximize your light use, but this is not required.  Mylar is preferred as a reflective material but scrunched up aluminum foil also works...just make sure you crush it up evenly all over as it's pretty worthless when smooth.  Flat white paint is an ideal reflective material as well.

That's it!  You're now ready to start your shoestring budget stealth grow.  Leave your questions & comments below.


Tuesday, July 3, 2018

I'm Baa-aack


Update:  Check out my 8-part series on growing your own autoflowering cannabis on a budget!


In case you've been wondering about my absence, I've been immersed in my first real cannabis grow!  And it was a success!  A very small-scale success, but a great one nonetheless.  I spent the bare minimum on supplies & put in maximum time & effort to learn everything I could about growing, and the results were better than I could've hoped for.  I'd love to use what I learned to mentor other growers on how to complete cheap, stealthy, low-space grows.  So that's what I'll do for the next few installments:  share what I learned about growing bomb bud on a budget.

Do you live in an illegal state?  With non-420 friendly roommates?  Don't have the money to sink into an expensive, high-tech grow op or the space to support a bunch of giant stinking weed plants in your house for 6+ months?  Then we're on the same page.  Sometimes ya just need to start with the basics to get a feel for something before going balls-to-the-walls.  And learning can be very lucrative if you stick with it to the end. 

Growing ganja has many advantages, particularly for those who don't live near dispensaries or other sources of high-quality bud.  And even if you DO live near a dispensary, commercial weed is often grown in a rushed fashion using questionable fertilizers & pesticides that can affect taste, quality & possibly your health.  (Check out my previous article on plant growth regulators.  If that doesn't scare ya, nothing will).  By growing your own stash, YOU control exactly what goes in so you know what's coming out.  It might sound cliche, but there's just something special about weed that you grew yourself.  Now I can say that from first-hand experience because I've actually done it.  And there IS something unique about this weed.  It doesn't trigger a bit of anxiety or dry mouth like every other strain I've ever smoked.  I'm still shocked at just how mellow the high is.  I am extremely sensitive to the paranoid, heart-racing properties of THC but get none of that from the homegrown bud.  But more on that later.

My April 4th baby was harvested on June 24th; 82 days from seed.  I spent a grand total of $68 on everything including lights, soil & 7 feminized seeds.  When all was said & done, I harvested 4 grams off a plant that was grown in an 18-oz Solo cup (red beer cup) using 2 Compact Fluorescent Lights & a $10 Chinese LED gooseneck lamp.  No grow tent, light timer, exhaust fans or other equipment.  Didn't even use any store-bought nutes or fertilizers.  Just lights in a closet.  And the bud is superb.  

Here are the highlights of my grow journal on imgur.  There were some ups & downs as you can see, but she ultimately pulled through & delivered in the end.  And I came away with enough info to write a small book on the subject of small-scale stealthy grows. 

More to come in the days ahead... Leave any questions in the comment section & I'll try to address them in the upcoming articles. 

Monday, April 16, 2018

Plant Growth Regulators: The Dangerous Secret In Some Hydro Bud

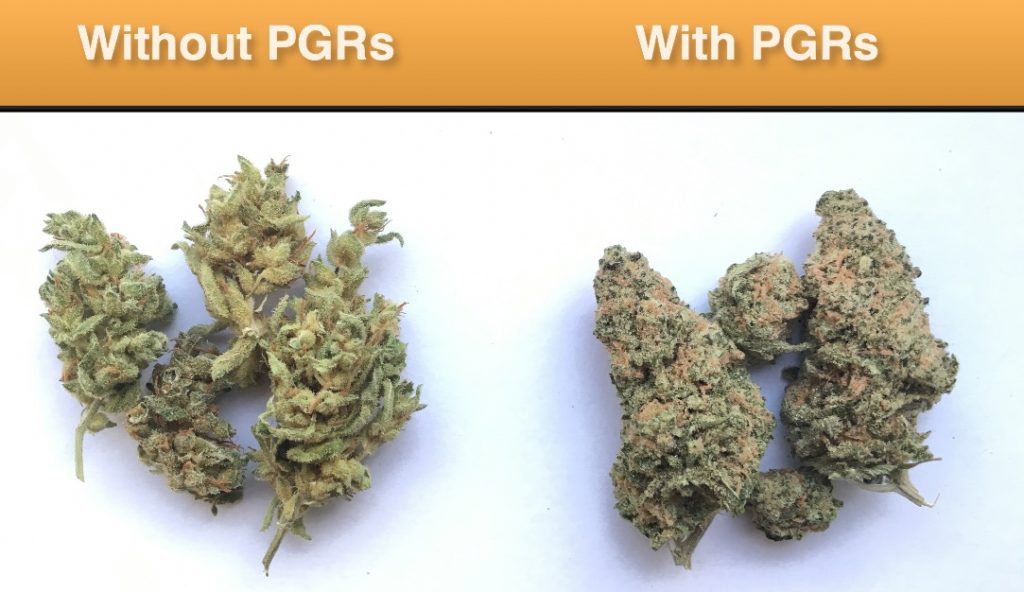
With the rise of legal & decriminalized cannabis, we assume that things will get safer.  After all, dispensaries have certain quality control practices they must follow, right?  While it's true that legal cannabis may be "cleaner" in terms of fungi, bacteria & other contaminants, there are other potential health risks lurking in some hydroponic weed.  Namely, plant growth regulators.  These substances include chemicals like daminozide (Alar) and paclobutrazol and are used to retard the upward growth of cannabis plants while increasing bud density.  They are not pesticides and serve no legitimate purpose other than speeding up harvest & increasing bag appeal, and they're potentially very dangerous to your health.

Plant growth regulators have many uses ranging from keeping golf courses in check & improving the aesthetic appearance of flowers to limited use in some food crops.  Not all plant growth regulators are dangerous to human health.  Some are safer than others & merely inhibit or enhance natural substances like Gibberelic acid within the cannabis plant.  But some are more questionable.  Daminozide (Alar) was found to be a likely carcinogen in the 1980s & caused a huge public outcry that eventually attracted the attention of celebrities including Meryl Streep & Walter Cronkite.  To this day it's still banned for use on food crops.  Ditto for paclobutrazol.  While it's sometimes applied to crops after harvest, it's been shown to cause liver toxicity in high doses & has not been sufficiently studied in humans to determine the safety of low doses over time.


So just how dangerous are these compounds when ingested in cannabis?  Common sense says that, if they're known toxins in high doses, they are most likely dangerous in chronic low doses as well.  And little is known about what happens when they combust during smoking.  More troubling is the fact that a number of cannabis fertilizers contain these substances without listing them on the label.  These brands include but aren't limited to:  Phosphoload, BushLoad, Flower Dragon, Bushmaster, TopLoad & Gravity.  If they are so safe, why hide the fact that you're including them in your products?  All of these brands have been banned in California due to their deceptive labeling but are still sold "behind the counter" in some hydroponic shops across the country.    

Australian weed grown with PGRs
When used in excess, PGRs like paclobutrazol can fully deform the cannabis plant, twisting the leaves & causing the buds to grow an abundance of red pistils.  This problem is a full-on epidemic in Australia where weed grown with these chemicals is colloquially called "Bikie Buds," "Paclo" or "PGR".  The high is short-lived & often results in a headache or nausea on the comedown.  Some of the buds don't even resemble cannabis & instead look more like those International Oddities legal buds sold in High Times back in the day.  I was taken aback by this phenomenon & really hope the Aussie government softens their cannabis laws soon to do away with the problem for the safety of their citizens.

We need to remain vigilant about this issue in the States as well, especially since legalization & widespread commercialization of cannabis is taking off.  The incentive to produce as much cannabis as possible to meet demand is extremely high right now as a few states shoulder the burden for the whole U.S. Ask your budtender about the use of PGRs on their products, or better yet, grow your own cannabis to avoid the whole issue. 


August Donations ♌☼🦁🌄🌴

Trying something new.  Rather than tacking donation links onto the end of every other article like I've done forever, I'm gonna star...